KOHA FAQs
Circulation
Can I override a renewal after an item as reached its renewal limit?
No, there are no overrides in Koha. If you want to allow the patron to have the item longer, you must check it in and then back out.
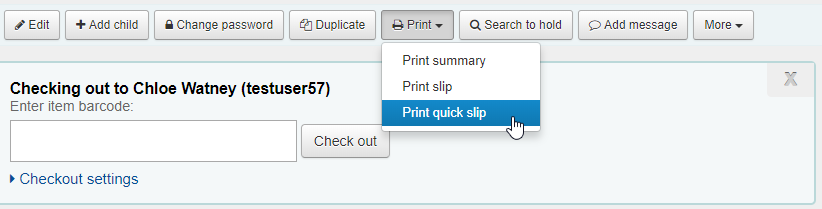
Why doesn’t the checkout receipt print immediately when I’m done checking out items to a patron?
This is the way Koha was designed. You will need to click Print and slide down to Print Quick Slip and click it to print a checkout receipt.
How do I mark an item as in-house use?
Every library will have a “Statistical Patron” card. You will check out your in-house use items to this card. No need to check them back in as it will only record the transaction as a statistical transaction.
What is a manual credit?
Don’t use it as it currently does not work right in Koha.
Can I still check out an item to a patron if I find that there is a hold on it from another patron?
Yes, you will be faced with the following Confirm Checkout screen.

I’ve chosen auto-renewals, how will that work?
3 days before an item is due, the patron will receive an email stating that either:
- The item renewed successfully. Your new due date is ________ (It will renew from the original due date. As it does now in Sirsi.)
- The item did not renew because _________ (either you’ve reached your renewal limit or another patron has it on hold)
NOTE: With auto-renewals, you cannot manually renew items. There is no way to notify patrons who do not have an email on file.
How do I mark an item as Claims Returned?
Watch this short video to see how to mark an item as Claims Returned in Koha.
- Look up the patron
- Click on the Checkouts tab
- Click on the barcode of the item they claimed to have returned, this brings up the item information for that item
- Change the Damaged Status to Claims Returned and click Set Status
- Click the patron’s barcode number next to checkout status
- Click on Checkouts tab
- On the far right, you will see a Check in column, check the box next to the item you are marking as claims Returned and click the Renew or check in selected items button
- Copy the barcode of the item, go up to add a message to the patron’s account
- In the predefined notes drop-down, chose Claims Returned – add barcode
- Paste the barcode over “add barcode” and click Save
How do I check in items from the book drop?
- Click Circulation
- Click Check In
- Check the box for Book Drop mode (it will automatically set the return day to the last day you were open)
- Put your cursor in the check in box and start scanning items
Holds
How often is the holds queue updated?
The holds queue will be updated every 15 minutes.
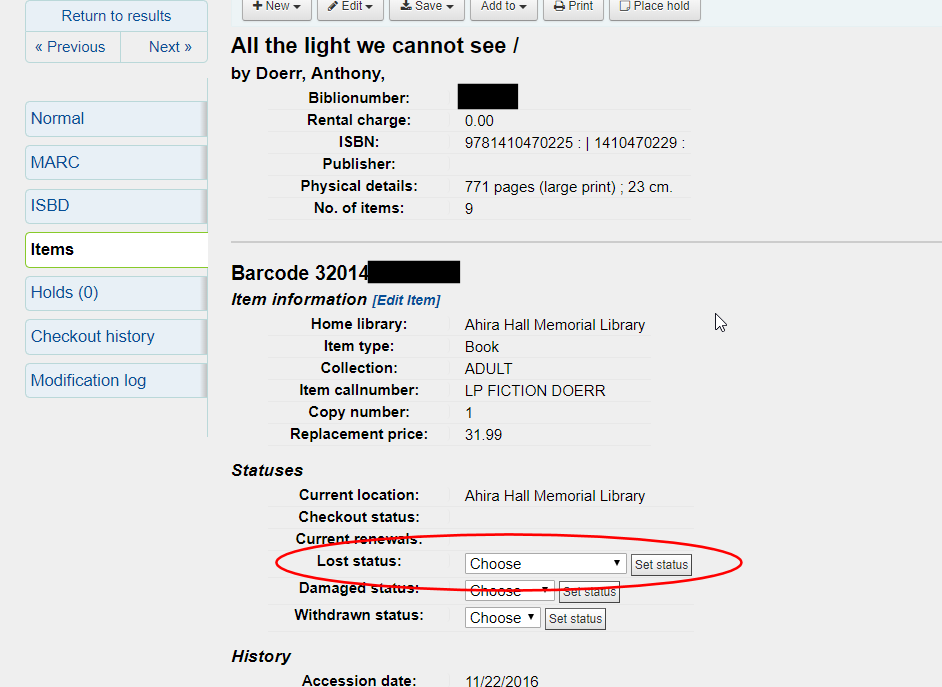
What if I can’t find an item on my holds queue list? How do I mark it as MISSING?
- Click Search the Catalog
- Look up the item by typing in the barcode number
- Click on the Item tab
- Change the Lost status drop-down to Missing and click Set status
Can we limit the number of holds a patron can have?
No, Koha cannot limit the number of holds a patron can place.
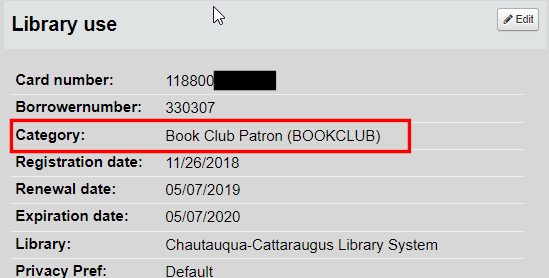
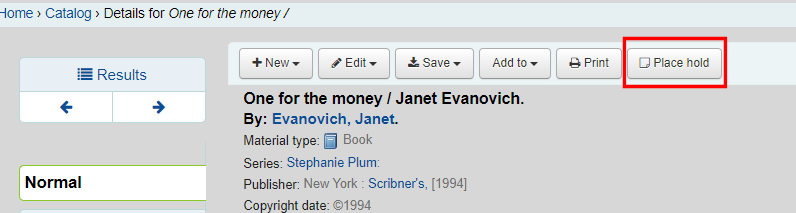
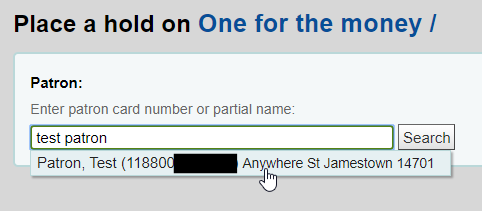
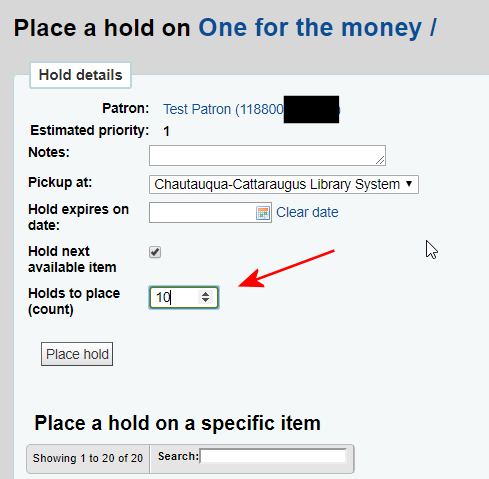
How do I place a bulk hold for Book Clubs?
Click here to download the PDF
- If you haven’t already done so, change the category on the Book Club patron card to Book Club Patron.
- Search for the title and then click the title when you find it.
- Click Place hold.
- Search for the Book Club patron.
- Leave the Hold next available item box checked, enter the number of copies you need in the Holds to place (count) box and click Place hold.
How do I see a list of patrons waiting for an item?
- Click Search the Catalog and lookup the item
- Once you find the title, click Holds (it will display a number for how many holds are on that title)
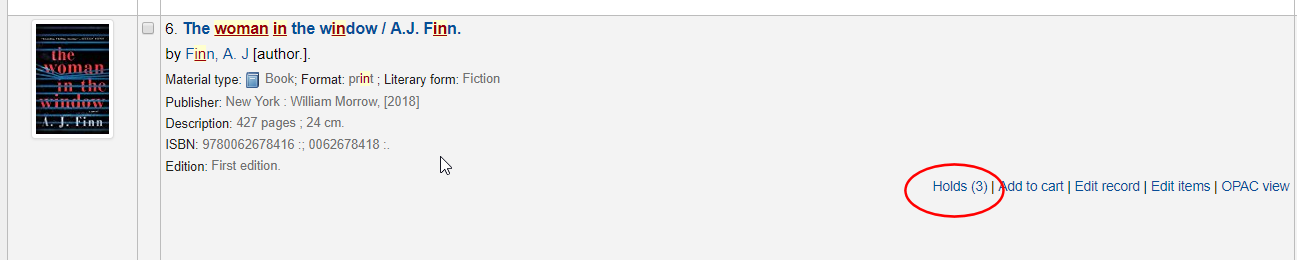
- You will be able to see the list of patrons waiting for the item.
How do I know if my patron will receive an email or text message that their hold is available?
When the hold slip prints out, at the bottom will be 2 fields. One labeled Email: and one labeled SMS:
- If they are both blank, then you know that you need to call the patron to tell them their hold is available
- If one (or both) are filled in with their email address and/or cell phone number, then you know they will be notified that way
How do I place multiple holds for a patron?
Click THIS PDF to view the steps needed to place multiple holds for a patron.
Items
How do I bulk edit items?
We knew this as Global Item Modification in Sirsi.
- Gather the items that you wish to bulk edit. E.g. You have 15 books that would like the Shelving Location changed from New Books to Adult Fiction.
- In Koha, click Tools
- Click Batch Item Modification
- In the “Scan items one by one” section, scan all the items that you wish to edit
- Click Continue
- In the Shelving Location drop-down, choose your new Shelving Location
- Click Save
How do I discard items?
You no longer check out your discarded items to a DISCARD card. You modify them in bulk to set their Withdrawn Status to Discard.
- Gather the items that you wish to discard
- In Koha, click Tools
- Click Batch Item Modification
- In the “Scan Items one by one” section, scan all the items you wish to discard
- Click Continue
- In the Withdrawn status drop-down, choose Discard
- Click Save.
What is the inventory process in Koha?
The instructions for the inventory process in Koha are located HERE.
OPAC
How will my patron’s sign in to their accounts on Go Live day?
Unfortunately, patron’s PINS/Passwords cannot be carried over into Koha. They will sign in to their accounts with their library card number and the last 4 digits of their phone number. They may change this if they wish.
- For existing patron’s, their PIN will be the last 4 digits of their current phone number on file.
- For new patron’s, starting 10/29, the PIN field will be automatically set to changeme upon creation. At that point, you can change it to the last 4 digits of their phone number. Please do not keep it as the default.
Patrons
What are guarantor/guarantee accounts?
You may attach a Juvenile patron (guarantee) to their parent’s/guardian’s (guarantor) account. THIS IS OPTIONAL!
You may use guarantor/guarantee accounts so that you know who to contact if a Juvenile patron never returns an item and a they are automatically billed for the item. Guarantor accounts currently cannot see a Guarantee’s current checkouts in their (the Guarantor’s) account.
When creating a Juvenile account, do you need to attach it to a guarantor account?
No, attaching a Juvenile card to a parent/guardian’s card is optional.
Under patron messaging preferences, if both SMS and Email are checked, will the patron get both?
Yes, the patron will get both notice types if both SMS and Email are checked.
If my patron doesn’t have an email or cell phone number on file, how do they get their overdue notices?
An email will be sent to the library every morning of those overdue notices so that you can call the patron(s).
What is the procedure for lost cards?
Simply edit the patron record, delete the old card number in the “Card number” field and scan in the new card number. Click Save.
Will our patrons’ current notice preference carry over into Koha?
No, for existing patrons you will need to set up their patron messaging preferences. Or they may do it themselves when they log in their online account.
Why does gender not have a drop-down under Additional attributes and identifiers?
This was carried over from a current ILS. In Koha, gender is denoted under Patron identity, so this is not needed.
It will not be there once we are LIVE.
Will the patron NOTE field be migrated to Koha?
Yes, the patron NOTE field from Sirsi will be migrated to Koha.
How do I add a juvenile (guarantee) account to a parent/guardian (guarantor) account?
- Look up the juvenile account
- Click Edit and scroll down until you find the “Guarantor information” section
- Click the “Set to patron” button
- This opens a new window where you can search for the parent/guardian account
- Once you find the correct account, click Select next to their account
- Add the relationship in the relationship drop-down
- Click Save
What is a self-registered patron?
A self-registered patron is a patron that registered for a library card via the online form on the OPAC. This form will set up an account in Koha that is active for 28 days.
With this self-registered account, patrons can:
- Checkout and place holds on eMaterials via OverDrive
- Place holds in the OPAC on print materials
When a patron comes in with a self-registered account, staff will need to:
- Look to see if the patron has another library account on file. If so, stop there. Merge the self-registered account with their original account, keeping the original account.
- If no other account is on file, verify the patron’s information (address, phone number, etc.) via your usual method
- Give the patron a library card and enter that barcode number into the account
- IMPORTANT: Change the patron category from Self-Registered to the proper patron category. E.g. Adult Patron, Young adult patron, etc.
- IMPORTANT: Renew the patron’s account
PLEASE NOTE: Self-registered patron accounts will automatically delete after 28 days if staff do not follow step 4.
Searching
Are public notes searchable?
Yes, public notes are searchable in both the staff client and on the OPAC.
Staff
Can we have group staff accounts?
No, every staff member/volunteer will need to have their own staff account to sign in to the Koha staff client. Once we are LIVE, they will sign in with their current library card number and PIN/Password.
Which internet browser should I use for the Koha Staff client?
It is recommended that you use the Firefox browser for the Koha Staff client. You may also use Google Chrome. Koha Staff will not work in Internet Explorer or Microsoft Edge.
Can I use my existing barcode reader and receipt printer?
Yes, your existing barcode reader and receipt printer will work with Koha.
We suggest setting your receipt printer to be the default printer on your checkout computer.